
"Installing Windows 2000 Professional"
loadTOCNode(2, 'summary');
To install Windows 2000 Professional, follow these steps:
1.
Start the installation by using one of the following methods:
•
Start from the Windows 2000 Professional installation CD-ROM. Make sure that the CD-ROM is set to start before the hard disk starts. Insert the CD-ROM, and then when you are prompted, press any key to start the Windows 2000 Professional Setup program.
•
Start from boot disks. Insert Disk 1, and then insert each of the remaining three floppy disks when you are prompted to do so. For additional information about creating boot disks for Windows 2000, click the article number below to view the article in the Microsoft Knowledge Base:
197063 (http://support.microsoft.com/kb/197063/EN-US/) How to Create Setup Boot Disks for Windows 2000
•
Start from within a current operating system. Insert the CD-ROM, and then, at a command prompt, type drive:\i386\winnt32.exe and then press ENTER, or if this is an installation on a computer that has no previous installation of Windows, type drive:\i386\winnt.exe and then press ENTER, where drive is the letter of the CD-ROM drive.
2.
Setup inspects your computer's hardware configuration and then begins to install the Setup and driver files. When the Microsoft Windows 2000 Professional screen appears, press ENTER to set up Windows 2000 Professional.
3.
Read the license agreement, and then press the F8 key to accept the terms of the license agreement and continue the installation.
4.
When the Windows 2000 Professional Setup screen appears, either press ENTER to set up Windows 2000 Professional on the selected partition, or press C to create a partition in the unpartitioned space.
5.
If you choose to install Windows 2000 Professional on a file allocation table (FAT) partition, specify whether you want to:
•
Leave the current file system intact.
•
Format the partition as FAT16.
•
Convert the existing file system to the NTFS file system.
•
Format the partition by using the NTFS file system.Press ENTER after you make your selection. Setup examines the existing hard disks and then copies the files that are needed to complete the installation of Windows 2000 Professional. After the files are copied, the computer restarts.Important Do not press a key to boot from your CD-ROM drive when your computer restarts.
6.
When the Windows 2000 GUI Mode Setup Wizard appears, click Next to start the wizard. Setup detects and installs such devices as a specialized mouse or keyboard.
7.
When the Regional Options dialog box appears, customize your installation of Windows 2000 Professional for locale, number format, currency, time, date, and language, if necessary. Click Next.
8.
In the Personalize Your Software dialog box, type your name and the name of your organization, and then click Next.
9.
In the Product ID dialog box, type the 25-character product key, and then click Next.
10.
In the Computer Name and Password dialog box, either accept the default name that Setup generates or assign a different name for the computer. When you are prompted for an administrative password, type a password for the Administrator account. (You can leave the box blank; however, this is not recommended.) Click Next.
11.
In the Date and Time Settings dialog box, set the correct date and time for your computer. You can also specify which time zone you are in and set the computer to automatically adjust the clock for daylight saving time. Click Next.
12.
Setup installs the networking software and detects your network settings. When the Network Settings dialog box appears, click either
•
Typical to set default network settings such as File and Print Sharing for Microsoft Networks, Client for Microsoft Networks, and TCP/IP protocol that uses Dynamic Host Configuration Protocol (DHCP), or
•
Custom to specify the network components that you require for your network environment,and then click Next.
13.
In the Workgroup or Computer Domain dialog box, specify the workgroup or the domain to join. If you indicate that you are part of a domain, specify your domain user name and password. Click Next.Setup installs the networking components.
14.
During the final stage of installation, Setup installs Start menu items, registers components, saves settings, and removes temporary files. When the Completing the Windows 2000 Setup Wizard dialog box prompts you to do so, remove the Windows 2000 CD-ROM, and then click Finish to restart the computer.
15.
After the computer restarts, click Next in the Welcome to the Network Identification Wizard dialog box.
16.
In the Users of This Computer dialog box, specify either that users must enter a user name and password or that you want Windows 2000 to automatically log on a specific user when the computer starts. Click Finish.When the Windows 2000 Professional desktop appears, the installation is complete.
Thursday, December 13, 2007
Tuesday, November 27, 2007
Assignment #1
"Windows 9x/Me Installation"
How to Dual-Boot Windows 9X/Me and 2000 Prolast updated: 6/10/01
Introduction. The purpose of this article is to provide step-by-step procedures for installing both Windows 9X/Me and Windows 2000 Pro on the same hard disk drive so that either operating system can be selected from a menu when the computer first starts/boots-up. Actually, a computer can be configured to boot Windows 2000, Windows NT, either Windows 95 or Windows 98, and MS-DOS. It cannot be configured to boot multiple versions of Windows 9X (Windows 95, 98, 98 SE, and Me) because they use the same boot file; however, there are third party utilities which can do it. Install MS-DOS first, to multiple boot Windows 2000, Windows NT, Windows 95 or Windows 98, with MS-DOS. This article will show how to dual-boot Windows 98, 98 SE, or Me with Windows 2000 Professional. Multiple-boot configurations with Windows NT and Windows 95, etc. are implemented in a similar fashion.
Step-by-Step Instructions.
1. See our How to Install the Windows 98 Upgrade on a New Hard Disk Drive, How to Install Windows Me, and How to Build a Computer with an AMD Socket A Athlon or Duron Processor: Part 8 - Prepare the Hard disk Drive and Part 9 - Install Windows and Motherboard Drivers for instructions on partitioning a hard disk drive and installing Windows.
2. Partition your hard disk so that you have a separate partition for each operating system. Or, partition your drive so it has one partition for Windows 9X, SE, or Me (we'll call it Win 9X from now on) and enough free space (unpartitioned space) for the installation of Windows 2000 (we'll call it Win 2K for short).
Windows Me was already installed on my 30 GByte drive. It had two partitions and 4 GBytes of free space. I installed Win 2K into the free space. The Win 2K installation partitioned and formatted the free space. This will be described later in this article.
If you are going to do this procedure with a disk drive that already has data on it, I strongly recommend that you back-up your data. I didn't. Proceed at your own risk.
3. Install Win 9X first. If you install it after installing Win 2K it will overwrite the C:\BOOT.INI file you will not be able to dual-boot.
4. Boot to Win 9X.
5. Insert the Win 2K CD in your CD-ROM drive.
6. It should autostart and display the following message:
This CD-ROM contains a newer versions of Windows than the one you are presently using. Would you like to upgrade to Windows 2000?
7. Click Yes (we will not actually upgrade Win 9X).
8. This may result in the following error:
The option to upgrade will not be available at this time because Setup was unable to load the filec:\WINDOWS\UpgDlls\w95upg.dll\WIN9XUPG\W95UPG.DLLThe system cannot find the file specified.
Ignore the error and click OK.
9. This will produce the following message:
Welcome to the Windows 2000 Setup Wizard....
What do you want to do?
o Upgrade...o Install a new copy of Windows 2000 (Clean Install) ...
Friday, November 16, 2007
amd memory
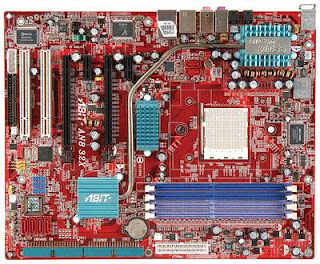 Memory is supported by four 184-pin DIMM sockets with the usual Dual channel DDR400 non-ECC un-buffered memory capability. Maximum memory capacity is up to 8GB. Onboard features are four ports SATA 3Gbp/s RAID 0/1/0+1 controller from the South bridge and two SATA 3Gbp/s RAID 0/1 ports from the Sil 3132 controller. Additional features include NVIDIA Gigabit Ethernet with NVIDIA Firewall ActiveArmor, Firewire IEEE 1394 support at 400 Mb/s transfer rate, AC'97 7.1-channel audio surround sound and auto Jack sensing and Optical S/P DIF In/Out.
Thursday, November 15, 2007
Latest Motherboard
 The Intel® Desktop Board DG965OT is based on the Intel® G965 Express Chipset that supports 1066-MHz system bus, Intel® Graphics Media Accelerator X3000 with Intel® Clear Video Technology, dual-channel DDR2 800 MHz SDRAM and discrete PCI Express* x16 graphics in the micro ATX form factor. Premium features such as support for Intel® Viiv™ technology∇, Intel® High Definition Audio (enabling 7.1 surround sound), Dolby* Home Theater* certification, Intel® PRO 10/100/1000 Network Connection and 1394a deliver stability and new features for consumers to enjoy a great digital entertainment experience. This Intel Desktop Board comes with the software required to meet Intel® Viiv™ technology brand verification requirements, which simplifies the task of building a PC based on Intel® Viiv™ technology.
 NVIDIA nForce® media and communications processors (MCPs) are a key motherboard component providing essential technologies for your PC. Designed with an innovative, highly integrated architecture, NVIDIA-based motherboard solutions provide high-speed system performance, advanced networking, and unparalleled storage solutions to both AMD and Intel platforms.
 The Intel® Desktop Board D945GCZ delivers new levels of performance and flexibility to the Digital Office and Digital Home. Based on the Intel® 945G Express Chipset, this board supports dual-core processing, Intel® EM64Tφ, and advanced Intel® GMA950 on-board or PCI Express Graphics.The Intel® Desktop Board D945GCZ is Microsoft Windows Vista* Premium Ready. The Intel® 945G Express Chipset fully supports the visually stunning Windows Aero* user interface with amazing transition effects and realistic animations.
Subscribe to:
Posts (Atom)
